Monday, August 1, 2011

Whimsical Memory/Gift Boxes made with Creative Paperclay!

A little bit of information before starting on this post...... The beginning pictures of my project all got lost. :-( I was in a real tizzy after finding out that the card in the camera that I was using was not working. I thought maybe that the pictures were still on the camera and not on the card since I had reviewed them on the camera, anyway when I got ready to take more pictures, the first ones on there weren't there. Uh Oh! I had already gone beyond those pictures and wasn't able to start over with that project. Hmmm what to do? Well start over I suppose! I used a smaller box (jewelry) this time.Here's a list of the items that I used on the project:

Creative Paperclay                              Paint (acrylic)
A candy box or jewelry box                  Stamps
Brushes                                               Molds
Embellishments                                    Glue


Here's the start of the project:


After I rolled out some paperclay, ( I use a fondant roller ) I attached it to the box lid. I used glue between the clay and box as I didn't want the box to get to wet and disintegrate. lol I pressed the stamp into the clay to make an impression and thought it turned out quite nicely:         

After I stamped into the creative paperclay I used a copper metallic paint and got it into all the creases and crevices. I then used champagne metallic paint to go over the rest of the clay and sponged a couple of colors into the the clay lightly. Once the paints were dry I glued embellishments onto the clay, making my box just adorable I think. What about you?

 I gave you two different pictures to look at  'cause I couldn't get the lighting just right. The little round thing by the key is a button. Now this lid goes on a small jewelry box, but I think it would also be great as a little memory box also.

     Since I did get started on the candy box to be used as a memory box, I felt that I should finish that box also. I used stamps on the big box also and used a lacy looking stamp in one corner of the top of the box and also on the sides. I used different metallic paints on this box also but I also used glitter, and a few different embellishments such as buttons, a head which was created from paperclay and a mold, butterflies cut out of paper, a tiny key and ruffles around the whole thing. See....


Here's a couple of pictures of both boxes together:


What do you think of the hummingbird that I stamped into the lid of the bigger box? I had a lot of fun making these Creative Paperclay memory boxes and I think I will put things in them as kind of a time capsule of my life. Working with Creative Paperclay is a great time and you can purchase it at Michaels or Hobby Lobby or from guess where else? Yep, Creative Paperclay!!

Barbara
         

Monday, July 18, 2011

Bath Salts Jar for a friend from Creative Paperclay!!

Folks I'm just so excited about my project for today I can hardly contain myself!!!!!!! It really turned out so amazing.  I started out with a plain old jar and lid:

I then covered both the jar and lid with paperclay. It really looked plain but that's when I started workin' it :

This was just too plain for me so I took the lid and made a rose out of the paperclay and put in the center. I then fashioned rosebuds and placed around the large rose and added a few leaves for good measure.


Now things got to be a lot of fun.  I started out by painting my rose and buds a light pink and then painted the jar the same pink. I painted my leaves green and highlighted the rose and buds with glitter. I also glittered around the edge of the lid. Lid now finished! I cut out a victorian picture and Modge Podged it to the jar. I then sealed the jar and glued off white rick-rack around the picture and added a little butterfly to the side of the picture. 

I think it all turned out just beautifully don't you? Now to just fill the jar with some lovely bath salts and give to a good friend!

Barbara

Saturday, July 9, 2011

The Artsy Bloggers!!

Well here we are, time to hook-up with some Artsy Bloggers my friends!! Please take some time to check out each of the following blogs cause they're all very talented people who have some amazing things on their blogs:


Eileen Bergen-The Artful Crafter


Take a few moments to peek into the world of another artist: Scrap Girl and SG Product Designer, Brandy Murry. You may find some inspiration to help you grow in your art.

http://the-artful-crafter.blogspot.com/2011/03/artist-profile-brandy-murry.html


Beading Arts

Cyndi has a fabulous copy of 30-Minute Rings to give away, Come and enter to win!

http://www.beading-arts.com/2011/06/book-review-and-giveaway-30-minute.html


Estate Sale Chairs: Finished!

Cherie has finished the final step in her estate sale makeover.

http://cherieblogs.com/2011/07/05/estate-sale-chairs-finished/


 Laura - Taz's Corner


My Altered Book - "In The Zone"

http://tazscorner1.blogspot.com/


Mo(o)re Gourd Whimsies


Fourth of July Picture Frame with paperclay

http://barbara-moorewhimsies.blogspot.com/2011/07/fourth-of-july-picture-frame-with.html
 
Just link on up folks to see what's happenin' around the blogging community! Also I'm now within 15 posts of hitting 100, so.................. I'm gonna be thinkin' up some stuff to giveaway. Let me know whether you would prefer some gourd art, some bits and bobs of things, etc.
 
Barbara

Monday, July 4, 2011

Fourth of July Picture Frame with paperclay

Hello everyone! I hope that you all had a wonderful Fourth of July! I know this is the day after but I wanted to share this. Today we're going to embellish a picture frame with Creative Paperclay. I started out with an inexpensive wooden frame:
I covered the frame with glue and then added Creative Paperclay:
I then made some little firecrackers and put some blingy fuses in them, and cut some primitive stars out with an Xacto knife:
After allowing the Creative Paperclay to dry overnight, I painted the frame red, the firecrackers blue and the stars were painted white and then silver glitter was added to the stars. I then glued the stars and firecrackers to the frame  and voila' a very Fourth of July frame!

I don't plan on putting a picture in mine but rather to fashion something to place on the inside of the frame without the glass. I'll turn it into a patriotic picture and frame instead. Here's wishing you days filled with sparklies!! If you don't find your Creative Paperclay at your local hobby store you can purchase it directly from Creative Paperclay, http://www.creativepaperclay.com/  and if you like working with Creative Paperclay then you need to become a follower of the Creative Paperclay blog: http://creativepaperclay.blogspot.com/  cause you can get some really nifty ideas on their blog from me and all the other design team members!!


Monday, June 20, 2011

Creative Paperclay Gourd Penguins

From time to time I love to do something totally out of the ordinary and whimsical. I love penguins and thought I would show all my readers how I make a small bottle gourd into a penguin using creative paperclay. Here's what you start with:
Creative Paperclay

I know it seems like not much, I did use a little glue also. I got so excited while working with the paperclay on the one gourd that I decided to do a couple more. I worked with the clay using a little glue to make sure that the clay stayed on the gourds. I made tails, wings, and cute little fat cheeks and beaks. Here's what they looked like after the clay was put on:


Still not very pretty but starting to get some character! I then used a lot of paint and some glitter to make them pretty. After all the painting was done I sealed the penguins with a spray on sealer with a gloss finish:


The glitter didn't show up that well in these pictures but it really gave the penguins a nice look. I then made little hats and scarves for the trio and they really looked good. Voila' and here they are, three little penguins ready to play in the snow. They made me feel a little cooler just by looking at them and it was pretty hot today!


Barbara

Saturday, June 11, 2011

Artsy Bloggers Saturday Linkups

Wow, between getting shots in my back, teaching Gourd Art classes on Saturday and getting ready for a show on the 17th and 18th of this month I've just been super busy. I've got to say though that I'm really enjoying teaching classes on Saturdays. I've had several new students and even had a young man (12 years old) by the name of Ethan today. He didn't think that he could make anything with gourds but he really had a good time and got a really good start on one. He'll be back Saturday after next with his Mom to finish up. Next Friday and Saturday I have a show and so I won't be teaching.


Here's are the wonderfully talented Artsy Bloggers! I do hope that you will check out what's going on with each one of the following bloggers 'cause they are one super bunch:

Beading Arts
Copper tubing makes wonderful beads!
http://www.beading-arts.com/2011/06/copper-bead-necklace-part-one.html


Eileen - The Artful Crafter
Follow this tutorial to make a pretty and practical seed kit featuring seed planting strips
http://the-artful-crafter.blogspot.com/2011_04_07_archive.html


Estate Sale Chairs - Part 2
Cherie covers the seats and starts on the backs.
http://cherieblogs.com/2011/06/09/estate-sale-table-and-chairs-2


Laura - Taz's corner
Mail Art and postcards, plus a big Thank You!
http://tazscorner1.blogspot.com/2011/06/mail-art-and-postcards-plus-big-thank.html

Flowers and Art
Kim is trying once again to finish up unfinished projects. Come see the first one :)
http://flowerkim.blogspot.com/2011/06/another-unfinished-project.html

Barbara

Monday, June 6, 2011

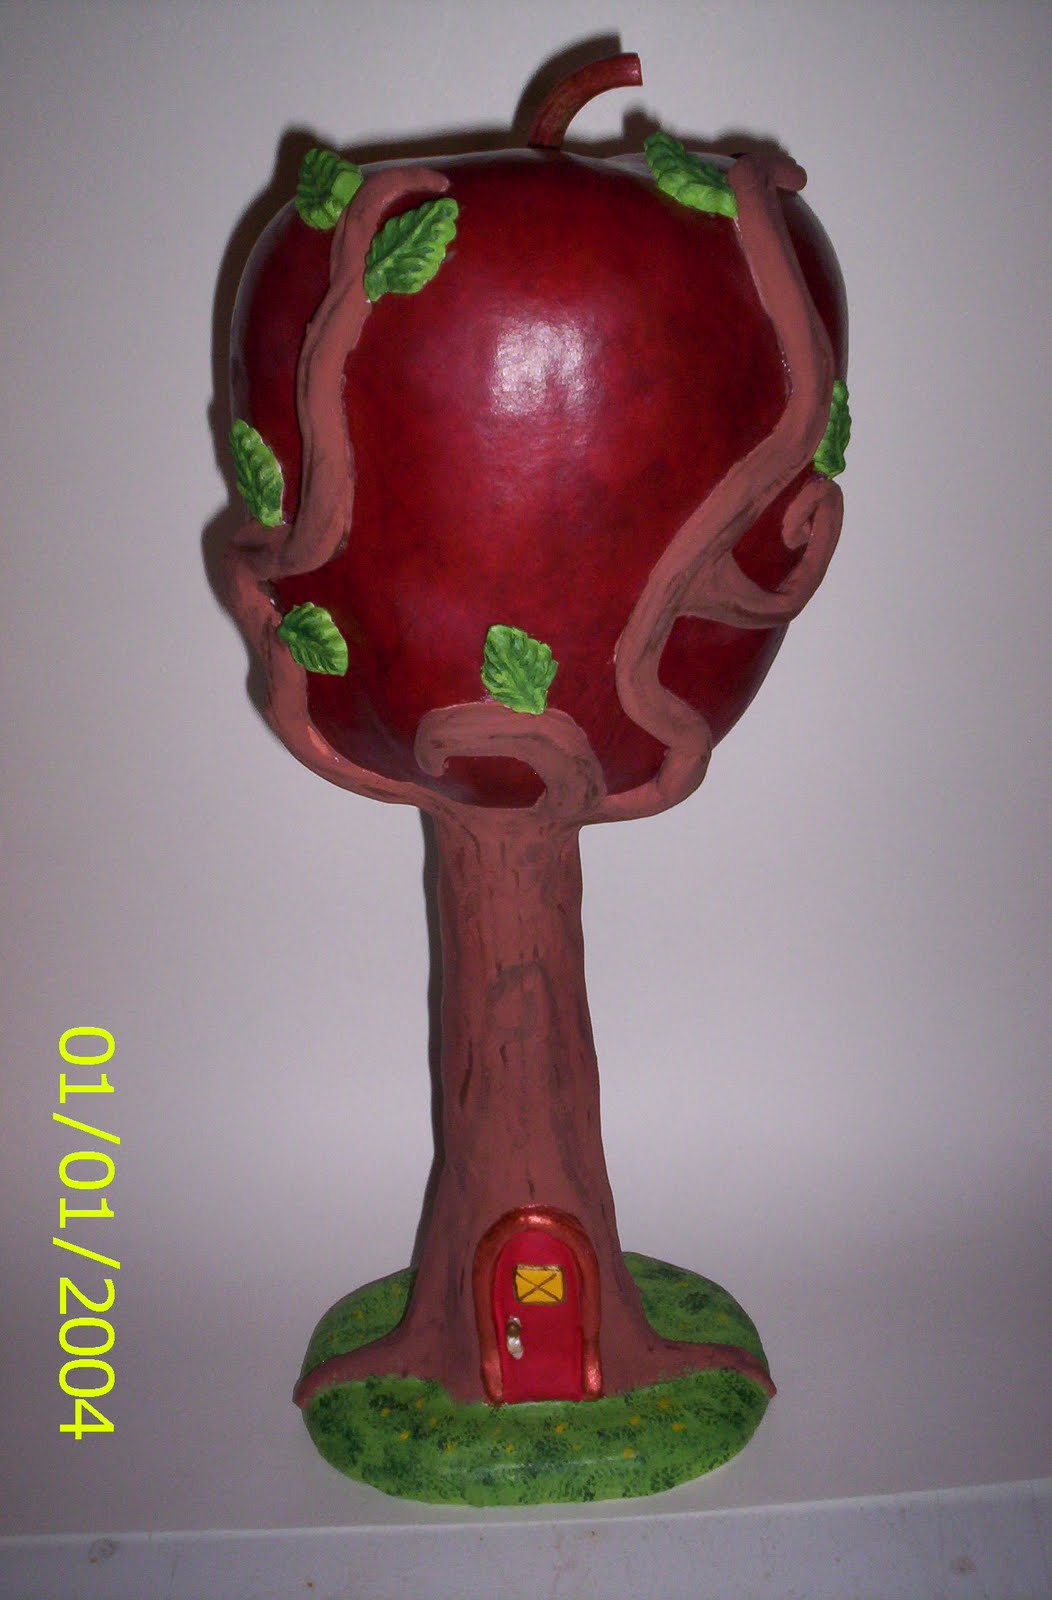
Gourd and Paperclay Apple Tree!

I really hope that all you folks really like the "Apple Tree" that I've made! I've had this idea for awhile but haven't taken the time to make it until now. Well for starters, I have several spindles cause I purchased a whole box of them at a Habitat for Humanity thrift store about three years ago. So.... I attached the spindle to a wooden base that I had purchased at Hobby Lobby. ( You don't have to use a spindle, you can use a piece of broom handle or big dowel rod). Then the spindle was attached to a very large apple gourd which I had picked out and been hanging on to for just this purpose:


Pretty neat huh? I used glue to attach them and let it set overnight. Once all that was started I used dye to color the gourd ( I used red and cordovan) and sealed the dye. I then used aluminum foil to make a base trunk for the tree. I also used a candy mold to put paperclay into for the leaves and let them set overnight to dry. This is the beginning:

Doesn't that color on the apple look real? Looked like a red delicious to me. Once the ground work was done I got to have the real fun! "Creative Paperclay" to the ready.... I then covered the base, trunk, and made the limbs of my "Apple Tree". To me it looked pretty neat even without the paint. I then glued my leaves on after sanding the edges of them to make them look good and also made a little gnome door on the front and left my project overnight to dry.

I was just so excited after I got the project this far. Now that everything was dry I painted my "Apple Tree" and then sealed it well so that it would last a very long time.


So tell me, what do you think? I love it and don't think the picture really does it justice. I can certainly tell you that working with Creative Paperclay is fun, fun, fun!!! You can purchase Creative Paperclay at a lot of hobby and craft stores like, Michaels and Hobby Lobby to name a few or from the creator of Creative Paperclay, Amaco. I hope you purchase some and try a project or two yourself, I know you'll like it.

Barbara


Thursday, May 19, 2011

Show-Me Gourd Society State Gourd Festival

As some of you may know, the weekend of April 28th I attended the State Gourd Festival in Sedalia, MO. What a wonderful time I had! I took a new class with a new technique in waxing that was developed by Miriam Joy of Miriam Joy Gourd Creations. Terrific class and I love this new technique.  I will show you some gourds made with this new technique in the near future. I taught this new technique to some of my students this past Saturday and they loved it too. So many pieces of Gourd Art to see, and ooooh and aaaaaah over. There were some very famous artists who had pieces entered into the competiions. The gourd society had several different classes and catagories in which to enter your art work. I took three pieces of my gourd art and entered them into the competition. I won blue ribbons on all three of them. The first piece was entered in the catagory "Whole Gourd any technique" the second catagory that I entered was "Cut Gourd any technique" and the third was "Useful bird house any technique".

Each leaf was woodburned unto this gourd. I used dyes for the leaf color. Between each leaf was carved out and painted black. I wanted it to resemble a pile of leaves falling to the ground.

This piece actually has a tree carved out on each side of the gourd. The tree itself was woodburned before it was cut out. I could only cut out a couple of pieces to use to clean out the interior of the gourd. Very difficult cleaning and then I used acrylic paint (Metallic sapphire blue) to color the inside. The trees were painted with crayon watercolors. I used dye for the exterior of the gourd and then sealed it.


This bird house was cleaned somewhat on the inside but not completely. The bird would use what's left in making their nest. Holes were drilled in the bottom for any drainage. The outside design was woodburned into the gourd and then the shapes were painted with crayon watercolors. I put several coats of sealer on the outside.

I hope you enjoy my blue ribbon gourds, I know I was very proud to win them!! If you are anywhere close to Springfield, MO you might want to attend the next State Gourd Festival. We voted on the last day of this festival to move the festival to Springfield, MO next year. The festival will be held at the Springfield fairgrounds. If you vacation in Branson, MO you might want to schedule your vacation for April 28, and 29th 2012. I hope to see many more people there this next year. I'm the chairman in charge of lining up the classes for it. I may even teach a class myself. Please give me some feedback cause I love to hear from everyone. You're all important to me and I have especially noticed all the new followers!!

Hugs to you XX
Barbara

Why not go check out what the other Artsy Bloggers are up to this week:

Beading Arts
And yet another chance to win a bead package giveaway!

Creative Dreamer
The final Creativity Invitation prompt is up... June hopes you'll all come play!


Eileen-The Artful Crafter
Who doesn't recycle cards and gift bags these days? This was a real simple recycling project. Look at the card Jackie gave Eileen for her birthday; and then how Jackie received it back on hers!


Laura-Taz's Corner
Art Journal Fun


Strawberry Rhubarb Crisp
When spring gives you strawberries and rhubarb, you've got to make crisp!

Monday, May 16, 2011

Paperclay is for kids too!

And now that school is out you might want to come up with some things that the children will enjoy doing and that will make them feel as if they have accomplished something on their own. I thought to myself that Summertime would also be a good time to make ornaments for Christmas.  I started this project by simply rolling out some paperclay and using a cookie cutter to cut out some Angels........

After cutting out a couple of Angels, and poking holes in their wings, I let them dry overnight. Next day after they were dry I used acrylic paints to paint them. Once the acrylic paints were dry, I spray sealed them and added a ribbon in the hole which was poked in the paperclay the day before.


They turned out very pretty and would be so simple easy for children to make. I hope you will get some Creative Paperclay and let your children take their projects to a whole new level, you'll be glad you did  You can purchase Creative Paperclay from their blog or website. You'll be glad you did.

P.S. You can use many things to make your ornaments out of, cookie cutters, cookie molds, candy molds, or just put something together freehand. It's all good and all fun!!

Tuesday, May 3, 2011

Put a little bling in your life!

As my first post on my blog about the wonders of Creative Paperclay I want to show you what I made. I like things that have a little bling or kick to them so I decided that I'd like to have a gourd brooch that was embellished with Paperclay. I used a book just out by Maria Dellos on ink and gourds for a little inspiration.

I started out with just a piece of gourd that I had carved out of a scrap of gourd and with a face that I had already formed in a mold and which was already dry. (It helped to get things moving along a bit faster. I then attached the face to the gourd with just a little E6000.)
Before attaching the face I woodburned some squiggles on the gourd piece. I then painted the face with some metallic acrylic paint in gold, blue, & copper touches. 
 Once the face was attached I used some more Paperclay to make a scarf to go around the face. I then painted the scarf with metallics. (Topaz, Sapphire, Copper, Gold, Green, & Purple) It really turned into a beautiful scarf. I added a little glue and some glitter on the bottom side to enhance the scarf.
But was that enough? Oh no my friends! I then took some multi-colored yarn, wire, and some beads and added a little bling to it. I then added a pin back to the piece so that I can wear it as a brooch. As you can see that end result wasn't bad, hmmmmm, no not bad at all!

Please pardon the pictures which were taken with a black background, but trust me the whites just wouldn't photograph very well sitting on white. I love my new brooch don't you? I also love Creative Paperclay and have used it for a long time, even before gourd art. It's very easy to work with and cleans up easily with just water.  It has stood out and become my favorite clay to work with on gourds. Also check out the Creative Paperclay blog for more tutorials and projects!

Barbara

While you're looking around blogland you must check out the Artsy Bloggers!
Cyndi shares her method of making a charm necklace from a vintage button!


Eileen Bergen- The Artful Crafter
Believe it or not, a friend of a friend whom Eileen had never even met gave her everything she needed to explore the luscious art of silk painting.


Laura- Taz's Corner
A Recap of Found Poetry and Altered Text


Made by Nicole
Learn how to make easy paper flowers with this step by step tutorial.


Pinwheel Craft
A fun and easy summer project for kids

Sunday, April 24, 2011

Creative Paperclay Design Team!!!

I'm sooooo excited to be able to announce today that I have been chosen to be on the "Creative Paperclay Design Team" !!! Oh my goodness I'm just beside myself!! Woooo Hooooo!!! Now you can expect to see some posts on using the paperclay on projects twice a month from me, and also posts from the other team designers! You can see my posts here on my blog but you can also see All the designers posts on the Creative Paperclay Blog. I hope you watch my posts and tutorials and I also hope that you start following the Creative Paperclay Blog 'cause who knows what's going to start happening with this new blog! I can tell you for sure that Creative Paperclay is my clay of choice and has been for years! It's really awesome to use on gourds too as you will be able to see in times to come.

So remember to follow the new Creative Paperclay Blog and myself and try this wonderful clay for yourself!


Barbara

Just got the opportunity to post the links for the Artsy Bloggers group as I've been out of town for a few days, sorry about that 'cause I know that you can't wait to check out these terrific links to the blogs .

Beading Arts

Home and Garden Cafe

How To Create a Memory Journal

Creative Dreamer

Saturday, April 16, 2011

Winner of the 100 followers giveaway!

Just as I promised, there was a drawing for the 100 follower giveaway here at the house this morning! We did things the old-fashioned way, I put the numbers and names in a hat and my hubby drew out the winning name and number. And the winner is: The number two comment by Terri Sproul who said.....love your work, hope I win. Glad you got over 100. I will post on my facebook page for you....smiles. Now wasn't that sweet? Here's what the giveaway looks like........

I took two pictures of the goodies that I have for the winner! Yes the trinket box is going, along with bits and bobs and a couple of egg gourds and a small apple gourd (all of which have already been cleaned) and whatever else I can think of to fill the box.  I thought a couple of small gourds might be just the thing to get someone interested in gourds. lol Congratulations Terri on winning!! This tutorial thing has been quite fun and I hope to do much more in the future.

Barbara

And now to see what all the other Artsy Bloggers have been up to this week:

Taz's Corner- Exciting News, The Altered Book Nook is Open!

Cherie Blogs - Peeptastic Centerpiece!

Moore(Gourd)Whimsies-100th Follower Giveaway Winner!

Mixed Media Artist - A shared trip of a trip to Guatemala

Made by Nicole- How to make graffiti backgrounds using materials you have on hand.

Flowers and Art- This week Kim experiments with Monoprinting

Eileen - The Artful Crafter - Learn to dye Easter eggs naturally. Not everything has to come from a kit or a mix.

Creative Dreamer - All those Altered Books June has been doing has left her with lots of pages she needs to do something with. Here's her first project...a Frame!

Kids Fun Reviewed - Chocolate covered Peanut Butter Easter Eggs. It's fun to make, fun to give these delicious handmade Easter eggs.

Friday, April 15, 2011

Check out these super duper Creative Paperclay Projects and Tutorials with Gourds!!!

I hope that you all read these tutorials with a forgiving mind as this is the first time that I've EVER posted a tutorial!! But here we go:

In my first gourd and paperclay tutorial I will be making a mask. Indian mask?, Egyptian mask? African mask? lol You tell me, but I will say it was fun. To start with you have to get a gourd that you think will work for a mask. I picked this "Martin" gourd. See how moldy they are to start with?After you scrub all that moldy stuff off of them you also have to clean the insides out by scraping ( a lot ). You should really wear a mask anytime you are dealing with gourd dust as you can develop respiratory problems if you don't. It doesn't bother all people but it really does some. Better to be safe than sorry I say. Then I cut the gourd in half and used one half for the mask. See how clean the inside and outside are? .....................................................
The next step was to cut out my eyes and mouth and play with the paperclay until I came up with these neat embellishments. LOL How do you like the lips??

The paperclay was the fun part. In this case I fashioned the eyebrows, nose and lips freehand. I apply the paperclay to my gourds by simply making sure that my gourd is WET where I want the clay to go and make sure that the back of the paperclay is WET also. Easy Peasy, just stick one to the other!!!! I've never had any of the paperclay come loose because as the clay drys (let it dry for a day or two depending upon how thick the clay is) it bonds to the gourd. If a part should ever come loose, I recommend using E6000 or something similar to reattach it.  Once my lovely mask was dry, I used dye on the face and ink on the paperclay to give it color........................................
The eyes were pieces of gourd that I glued to the inside and used glitter glue on for color.

Doesn't he still look a little bare?? Well after the color dried, I sealed the mask with a water based polyurethane sealer and then drilled holes in which I put feathers and ....... yep, you guessed it an old pair of hoop earrings with some little feathers glued to it.                                       Now then isn't this guy good looking or what??????


 My next tutorial is on a very small gourd which I made into a trinket box. I know a lady who has been wanting Victorian so I thought I would try to come up with something.  The first process is the same as for the mask in that you clean the outside of your gourd, cut out your top and clean out the inside. I then started out with this........................................
Now this container was very "thin" so the gourd shell needed some reinforcing. Normally I would use a mixture of glue and paint on the inside but I wanted to try something different. Instead I decoupaged a piece of flowered scrapbook paper with
"Collage Pauge" instant decoupage which is a water-resistant glue, sealer and finish all in one! When that was finished and dry, I started to work on the outside and in this project I used clay molds to create some flowers, leaves, and a face which I attached to the gourd while they were still damp. I used the same technique to attach the paperclay, wet to wet and let it dry overnight. Here's what it looked like after the paperclay molds were applied..........................................
Starting to look good isn't it??? Once dry, I used paints to color the flowers, leaves and face that were made from Paperclay,  PLUS I used a paint on the outside of the gourd itself. Then I took that stem off that I had been using to hold while painting and added a little glass stone for a knob and some extra little something around the face and voila' it's done????? Oops not until I get a base for it to set on and here it is!!


Well now what do you think? I was very happy with the results of both projects and of course I love to work with Creative Paperclay!!! If you have any questions on the projects that I've just posted please don't hesitate to ask a question.
Barbara

To make things even more interesting and fun this weekend why don't you check out what all the other members of the Artsy Bloggers group have been up to:

Check out this easy journal background! Taz's Corner!

The final chapter of Cyndi's e-book is now available! "Fibers, Fabrics, and Beads" challenges you to integrate all the fiber arts that you already love with your bead embroidery!


A Creative Dreamer
Just a reminder that the visual journal June created all through is going to given away to one lucky follower! But you have to hurry... the give away ends at midnight on Saturday!


Moore (Gourd) Whimsies
Last Day for the Giveaway!

Make a Fish Cake
If you have a fisherman in the family they'll love this fun cake idea!


Made by Nicole
Nicole shares a mixed-media art piece that is filled love for family and friends.


The Artful Crafter - Eileen Bergen
Make these darling lamb place card holders for Easter or any special spring dinner. So cute!

Homemade Mirrors with Poetry
It's National Poetry Month! In honor of that, Cherie is showing off a mirror she made using lines from one of her poems.


Kim = Flowers and Art
Kim loves dollhouses! Come see a miniature chandelier she altered to give it more style!

Thursday, April 14, 2011

Last Day for Giveaway!!

Hello my wonderful followers! Please don't forget that today is the last day for you to leave a comment and get your name entered into the drawing for a giveaway I'm having because I reached 100 followers!! I'm so happy 'cause I didn't just reach 100 but went past that amount. I hope that you will also read my Creative Paperclay post! I had so much fun creating with it. The ladies in my Gourd Art class have told me that they want to try the Creative Paperclay on gourds at one of our Saturday classes. Gotta practice myself before I try to teach someone else right?


Barbara

Thursday, April 7, 2011

Weekly Thoughts and Goings On

How has everyone been doing this week? I've got to say that I'm very proud that I hit 100 followers and not only that but went past the 100 mark! I have also gotten several more followers through Networked Blogs! I want you all to know that you've definitely each been noticed by me.  Please don't forget the giveaway that's going on here on my blog. All you have to do is leave a comment  on my March 30th post and be a follower of my blog.

I've been very busy working on gourds this week. I'm trying to get a few pieces done for competition at the end of this month. Next week I plan on having a special blog along with a tutorial on Friday about making some special things with Creative Paperclay. I hope you will tune in to check it out.

This past Monday the hubby and I had to go to Springfield, MO to his endocrinologist appointment. (Diabetes doctor) While we were up there we went to Marshfield, MO to visit with some good friends Evelyn and Larry Hampton of Hampton's Greenhouse and Nursery. They have an amazing corn maze every year and they grow some terrfic pumpkins! Right now they've got all of their garden plants ready and waiting in their greenhouses. If you live anywhere near them you need to get your garden plants and flowers from them. Evelyn can definitely let you know exactly how to take care of them. You'll end up with some great vegetables, I guarantee it.

Next Friday will also be the last day to leave me a comment if you are a follower so don't let the date slip by.

Barbara

Alrighty then folks! It's time to check up on all the wonderful things going on with the Artsy Bloggers group, so here's your list of terrific bloggers, go check them out:

Taz's Corner - Free-Mixed Media Tips and Techniques! Art Journals and More...
Laura shares tips from her secret stash of techniques and tricks!

Made by Nicole
If Nothing Ever Changed, There'd Be No Butterflies - this mixed-media art piece was made using the bits of paper trash acquired during the weekend.

Eileen Bergen-The Artful Crafter
Eileen made a necklace and earring set made from shells gathered on vacation and shares the directions.

Egg Carton Easter Bunny Crafts
A quick and easy Easter for the kids (and it uses up those extra egg cartons).

The Creative Dreamer
June is sharing a recipe for Spicy Thai Peanut Noodles...yum!

Barbara Moore(gourd)Whimsies
Weekly thoughts and goings on.

Beading Arts
Cyndi has a copy of a wonderful new book "Endless Sparkle" that she is just dying to give away!

Canvas Paper House- Part 2
Second part of the canvas paper house that Cherie is making for her Aunt.

Wednesday, March 30, 2011

Hello and 100th Follower Giveaway!

Hello there everyone! I want to clarify the giveaway rules and time sequence. The giveaway is going to run from April 1, 2011 thru April 15th at midnight. I will announce the winner on April 16th. There will be a really cool giveaway prize which I will post later. Here's the rules:
                               
                          1. You must be a follower of this blog.
                          2. You must leave a comment on this particular blog.

That's it folks! Easy Peasy! Love you all and I hope I get a lot of comments cause I love all of the folks that follow my blog and I do appreciate all of you. Don't forget to leave a way for me to contact you. Have a Happy Happy Day!

Barbara

You know you want to check out what's going on with all the rest of the Artsy Bloggers! Here's this week's linkups:

Beading Arts 
Do you like copper and turquoise together? Then you've got to check out this blog.

Creative Dreamer
 The March Creativity Invitation prompt is to create a journal page, and this month June has shared her techniques to create an entire journal... now she's giving that journal away. Come put your entry in!

Eileen- The Artful Crafter
Eileen shares directions for sewing a secret pockets hanger cover. This clever organizer can also be used to organize outfits.

Kim-Flowers and Art
Kim makes a bracelet out of wool roving. Come see how !!


Laura - Taz's Corner
Laura discusses the "art" of words

Made by Nicole
You'd never guess this pretty spring wreath is made quickly and simply with ordinary paper toweFun scrapbook idea for the pirate fan in the family.

The Kid's Fun Review
 Fun scrapbook ideas for the pirate fan in the family.

Cherie Burbach
Cherie talks about what to buy and what to skip at rummages this summer.

Monday, March 21, 2011

Look how close I'm getting!!!

Hey folks, look how close I'm getting to having 100 followers! I couldn't believe how close it was when I checked out my blog today. Sooooo, I'm thinking that I'm gonna have a giveaway! First off I've got to reach that 100 mark and hopefully go a few over. hint hint :-)  Then I'll have a two week period where people can comment on the blog, and then.......I'll have a drawing!!! As busy as it is right now in my life, I'm gonna have to give some real thought into what I'm giving away. I can guarantee that it will be a good thing. Any suggestions out there?  Looking forward to some feedback on this and more followers so this giveaway can start!!! March is Craft Month so I would love to get it started before the end of the month..

Barbara

Want to know what's going on with the Artsy Bloggers? Then link up here:
8 Fun Easter Cake and Cupcake Ideas


Easter's just around the corner, so here are some yummy treats to get you started.


Beading Arts

Cyndi posted a tutorial to show how she made her Bead Soup necklace!


Creative Dreamer

June shares a background technique for the visual journal journey going on!


Eileen - The Artful Crafter

Most silk scarf painting/dying is done with a stretcher frame. But if you don’t want to spend the money on a stretcher and are not planning a detailed design, this easy dye method can yield beautiful results as well.


Kim's Flowers & Art

Kim's goal: 30 journal pages in 30 days. Take a look at her progress.


Made by Nicole

What to do when paint smears ... troubleshooting mixed-media meltdowns.


Moore Gourd Whimsies

Barbara has some exciting news to share!


Yet More Ways to Use Up Rummage Sale Fabric

Cherie makes the third project from the fabric she bought for a quarter.

Tuesday, March 15, 2011

Such exciting new goings on!

I have had some major changes in my life lately! I must say they have been some really remarkable ones.  As many of you know, I've taken lessons from an extremely talently and nationally known gourd artist by the name of Joyce Campbell. Well we've become very good friends during this past year. I spoke to Joyce a few weeks ago and she let me know that she was going to be moving to California to be close to her mother who is 86 years old now. At that time she asked me if I would like to take over her business so to speak here in Arkansas where I live. I was soooo honored that she choose me to replace her in her classes here!! Of course I said yes and it's been a whirlwind ever since. I will be having classes every Saturday just as Joyce does at Hill Country Gallery in Mountain Home, AR. I'm also now an Associate at that Gallery and am trying to put many Gourd Art pieces in there. Therefore I've been very busy because I've got Gourd Art in several other places too! Here are a few of my current works:

Somehow I managed to cut off a little bit of most of the pictures but hopefully I will get better at doing this, and hopefully you can see enough of the picture to realize what I'm doing. I've been working on several other pieces lately plus I'm making a trip to purchase uncleaned gourds for me and also for my classes tomorrow. It's a 10 hour drive round trip plus some time to pick out gourds so it makes for a very busy day. ( at least 12-14 hours) I've been purchasing a lot of tools and mediums for the classes. Here's a pic of one of the classes and one of the ladies who made a couple of gourd art masks last week:
The classes are so enjoyable and you don't have to be an expert to take a class. The students just really have fun. I even have an 80 year old man who is really good. He and his wife spend the winters in the area and this will give them something to do. He also does stained glass and you should see what he's done with the glass and gourds! I will do my best to get more posts on my blog and do it more frequently. LOL Hope you enjoyed today's post.

Another very exciting and proud moment for me is the fact that I am now a part of the Artsy Bloggers group!! Every week we link you up to everyone in the group so that you can check out what's going on with everyone in the group. Here's my linkies for this week (there are three new bloggers in the group including myself):

8 Fun Easter Cake and Cupcake Ideas


Easter's just around the corner, so here are some yummy treats to get you started.


Beading Arts

Cyndi posted a tutorial to show how she made her Bead Soup necklace!


Creative Dreamer

June shares a background technique for the visual journal journey going on!


Eileen - The Artful Crafter

Most silk scarf painting/dying is done with a stretcher frame. But if you don’t want to spend the money on a stretcher and are not planning a detailed design, this easy dye method can yield beautiful results as well.


Kim's Flowers & Art

Kim's goal: 30 journal pages in 30 days. Take a look at her progress.


Made by Nicole

What to do when paint smears ... troubleshooting mixed-media meltdowns.


Moore Gourd Whimsies

Barbara has some exciting news to share!


Yet More Ways to Use Up Rummage Sale Fabric

Cherie makes the third project from the fabric she bought for a quarter.


Barbara